POST-TEST – PART 1
PRESIDENTIAL FITNESS TEST
Unit
Overview
In Unit #3 of this course you took
the pre-test for the Presidential Fitness Test. Now it is time to take the post-test for the Presidential Fitness Test. You
will be taking the post physical fitness test in two parts. You will be
taking part one of the tests in this unit, and you will be taking part two in
the next unit. You must practice each test one time
before recording your score. You do not
want to practice the test and then take a test for your score in the same
day. In other words, you could practice
the Curl-Up Test then in the same day take a score for the Push-Up Test. You
have saved a copy of the Fitness Test Record Sheet that you downloaded to
record the scores of the pre-test in
unit #3. Notice that there is also a
place for the post-test scores on
the score sheet. You may use the same
Fitness Test Record Sheet that you used for your pre-test to record your scores
for your post-test.
You
will also be completing another activity log for this week.
- Open another copy of the blank activity log. If you need to download a new copy, you can download it
as a PDF file.
- Rename the activity log file, and save it on your
computer.
- Remember to have a parent or guardian enter his or her
e-mail address at the bottom of the form. This task should
be completed by the parent or guardian, not by the student. Doing this is
the equivalent of signing the form to verify that the student has
completed the activities listed on the activity log. The e-mail address
must be valid and belong to the parent/guardian. The teacher may contact
the parent/guardian at this e-mail address at any time. The e-mail address
will not be used for any purpose other than allowing the teacher to
contact the parent/guardian. Entering the parent/guardian e-mail address
is the equivalent of signing the form.
Recording
Your Scores
Remember, you should have a saved
copy of your pre-test results from when you took the pre-test in unit #3. There is space on this sheet to record your
post-test scores. This will make it
easier for you to compare the pre and post scores in the last unit of the
course.
As mentioned above, you will need to
send a copy of The Presidential Fitness Test Record Sheet to your VLA
instructor as an attachment in the questions section of this unit. This will show your scores for the
post-test. Use the same Fitness Test
Record Sheet that you used for your pre-test to record your scores for your
post-test. If for some reason you need
to download a new copy of the Fitness Test Record Sheet,
you may download it as s PDF file.
Remember, the test is to
be done with the supervision of a parent or guardian.
Also, you will be required to take
some body measurements for this unit just as you did in unit #3.
You will record your body measurements and keep them for your own reference so
you can compare these body measurements to the ones you took in unit #3. You will need your before- and after- body
measurements for some questions in the last unit of the course. Remember, one of the goals for this course is
to be physically fit, and hopefully you have lost some inches since the
beginning of this course.
Note: You will still be required to do your regular
weekly activity log and/or pedometer log.
The activities in this unit are in addition to your weekly activities.
Below is the list of events that you
are required to complete for this unit.
The remainder of the events will be completed in next unit.
·
Curl-Ups
·
V-Sit Reach
·
Right Angle Push-ups
·
Body Measurements
The procedure for each test will be
reviewed in this unit. Remember, you
should practice each test at least one time before actually recording a score
for your post-test. Do not practice and take the test on the same day. For the V-Sit
Reach test you will be given some specific directions on how to make some
lines with tape. These lines are necessary to complete this event. If you have any questions on any of the President’s Fitness Test, please notify
your instructor.
Materials Needed to Take the Test
- Tape Measure
- Masking Tape
- Stop Watch
Curl-Ups
Curl-Up Testing
§ Lie on a cushioned, clean surface with your knees flexed and
your feet about 12 inches from your buttocks.
§ Place your hands on the opposite shoulders with your arms
crossed.
§ Have a parent or guardian hold your feet and count your
curl-ups.
§ Keeping this arm position, raise your trunk, curling up to
touch your elbows to your thighs. Then
lower your back to the floor so that the scapulas (shoulder blades) touch the
floor. That would be one complete Curl-Up.
§ To start, a timer calls out the signal "Ready?
Go!" and begins timing you for one minute.
§ Stop the test when the timer says “Stop”.
§ A complete Curl-Up is counted for each time you lie back
down and touch the floor with your shoulders.
§ This is a timed test.
§ You may rest in the up position only.
§ Do as many curl-ups as you can in one minute.
§ Remember
to only count the Curl-Ups that are done correctly.
Curl-Ups Tip
§ Count aloud the number of repetitions that are done
correctly.
Curl-Ups Scoring
§ "Bouncing" off the floor is not permitted.
§ The Curl-Up should be counted only if performed correctly.
Remember do not do the practice
test and the test for score on the same day.
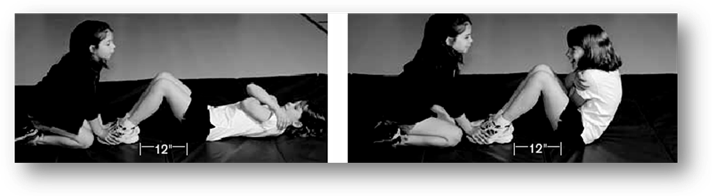
V-Sit Reach
Test
How to Make Your Measuring Lines
1.
Mark a straight line two feet long on the floor as the baseline.
2.
Draw a measuring line
perpendicular to the midpoint of the baseline extending two feet on
each side and marked off in half-inches.
Perpendicular lines are lines that intersect to form a right
angle.
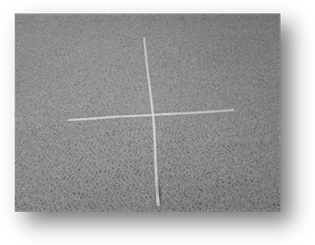
3.
The point where the baseline and measuring line intersect is the
"0" point.
V-Sit Reach Testing
§ With your shoes off, place your feet to 12 inches apart on a
line marked on the floor. This is the baseline, which will be crossed by a
measuring line that will be used to measure your flexibility.
§ Clasp your thumbs so your hands are together with palms
facing down, and then place them on the measuring line.
§ Have someone hold your legs straight and keep your toes
facing upward.
§ As you reach forward, exhale, and reach as far as you can
while staying in good position.
§ Try this three times for practice, and the fourth trial will
be recorded.
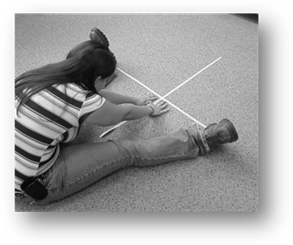
Practice the V-Sit Reach Test once, and then take the test for score. Remember
do not do the practice test and the test for score on the same day.
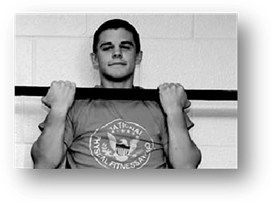
![]() Right Angle Push-Ups
Right Angle Push-Ups
Right Angle Push-Ups Testing
§ You should lie face down on a mat
in the Push-Up position.
§ You should have your hands placed
slightly wider than shoulder-width apart, palms flat on the mat, fingers
pointing forward.
§ Your legs should be straight,
parallel, and slightly apart with your toes supporting your feet.
§ Straighten your arms, keeping your
back and knees straight while you lower your body. Keep lowering until there is a 90-degree
angle at your elbows and your upper arms are parallel to the floor. Then push
back up.
§ Do one Push-Up every three seconds
until you cannot complete one at this pace.
Right Angle Push-Ups Tip
§ Spend as little time in the starting position beforehand in
order to increase the number of repetitions.
§ Any extra movement may also decrease the number of
repetitions.
Right Angle Push-Ups Scoring
§ Record only those Push-Ups done with proper form and
rhythm. 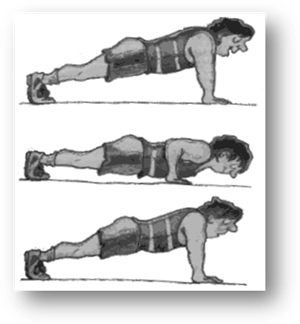
Remember, do not
do the practice test and the test for score on the same day.
Body Measurements
The purpose of exercising is not
only losing weight, but also bringing about the correct body proportion. Check
your measurements once a month and if you are working at the right intensity
level you will notice an improvement in your body measurements. The most common
measurements include the circumference of your chest, biceps, waist, hips and
thighs. Sometimes the neck, forearm and calf are also measured
How to Measure
|
|
Chest: Measure
around the largest part of your chest. Biceps:
Measure midway between the top of your shoulder and elbow. Waist: Measure
at the narrowest point, approximately one inch above your belly button. No
cheating! Don't pull in your belly or stick it out. Hips: Measure
your hips around the largest part of your buttocks with your heels together. Thigh: Thighs
are measured separately. Stand with your legs slightly apart. Measure your
upper leg where the circumference is largest. |

How?
§ Use a flexible measuring tape as used by dressmakers. It can
be as long as you need. If you use a plastic or cloth tape, bear in mind that
these materials may stretch over time.
§ Wear the thinnest clothes possible or none at all, so as not
to add to the measurements you take.
§ Try to measure yourself in front of a full-length mirror so
that you can see if the tape is positioned correctly.
§ Perhaps you could find another person to help with the
measuring. They would be able to read the results more easily.
§ Keep your muscles relaxed while measuring.
§ When measuring, pull the tape just tight enough to keep it
from sagging.
You will take your body measurements
including your height and weight. Use
the Body
Measurements Record Sheet that you downloaded previously to record your
measurements. You have already completed
the measurements in the column labeled #1.
The measurements you take this time should be entered in to the column
labeled #2. If you need to download a
new copy of the form, you may download a copy as a PDF File.
Here it is as a word document: Body
Measurement Record Sheet
This is your personal
information. You do not have to send
your body measurments to your VLA instructor.
You will, however, have to send your scores on the Presidential Fitness Test to your VLA instructor. The information on the Body Measurements
Record Sheet will help you see the progress you have made.