MANAGING MONEY – CHECKING ACCOUNTS
Unit Overview
In this unit, the student will learn about checking accounts and how this service makes managing money easier.
Checking Accounts
Checking accounts are another service offered by banks. A checking account keeps your money safe and gives you a way to pay bills without carrying cash. Using a checking account also helps you manage money by keeping track of your income and spending. Checking accounts make it easy to deposit money and to write checks to pay for expenses. You can open a checking account much the same way you open a savings account. You go to the bank, fill out an application and deposit money into the account. You will be given checks and most banks also offer debit cards. A debit card is a plastic card that you can use to pay for purchases. When you use a debit card the money is transferred directly from your bank account to the merchant.
You need to be careful to keep track of your balance. If you write checks for more money than you have in your account, your check will bounce and you will have to pay an overdraft fee.
![]() Checking Accounts
Checking Accounts
Questions to ask yourself when looking for a checking account that is best for you
1. How much money do I need to open an account?
2. Does the account pay interest?
3. Is there a monthly service charge on the account?
4. Is there a minimum balance I have to maintain to avoid fees?
5. Is there a limit on the number of checks I can write per month?
6. How much will it cost for new checks?
7. Is there a fee for an overdrawn check?
8. Does the bank offer overdraft protection?
Answer Assessment questions 1-3.
To put money into your checking account, you need to follow the steps listed below to complete a deposit slip.
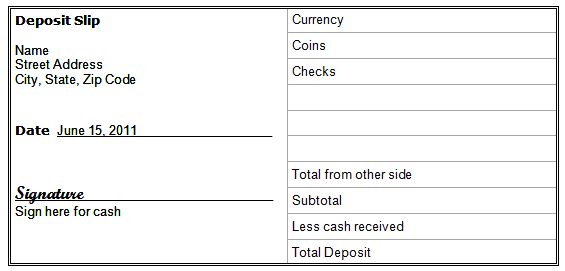 |
1. Name and address - Usually your name and address are printed on the deposit slip. If they aren’t, you need to write them in.
2. Fill in the date.
3. Record any currency you are depositing. Money is listed as currency (paper money i.e. 5 dollar bill, 20 dollar bill, etc.) and coins (pennies, nickels, dimes, etc.)
4. List the amount of each of the checks you want to deposit. If you have more than lines on the deposit slip, you need to list the additional checks on the back of the slip. These checks are then totaled and that amount is written on the front of the deposit slip on the “total from other side” line.
5. Next add currency, coins and check amounts; record the sum next to subtotal.
6. If you want to keep some of the money as cash, you need to write that amount on the “less cash received” line. You also have to sign your name on the signature line.
7. The last step is to subtract the “less cash received” from the subtotal and record the amount on the total deposit line.
Let’s Practice Filling Out a Deposit Slip
Open document Riley’s Deposit Slip and follow the directions. The document is an Adobe Acrobat file. Click on the pencil icon to open the document. Save the document to a folder on the computer; then then enter answers in the textboxes.
 Riley’s Deposit Slip
Check your work by opening document Riley’s Deposit Slip – Check Sheet.
For assessment question 4, open document Riley’s Deposit Slip and follow the directions. The document is an Adobe Acrobat file. Click on the pencil icon to open the document. Save the document to a folder on the computer; then then enter answers in the textboxes.
|
Riley’s Deposit Slip Answer Key (Password Protected) |
Writing Checks
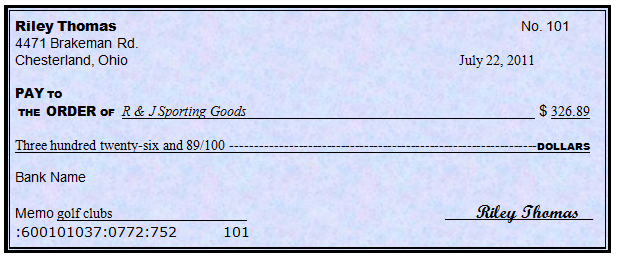
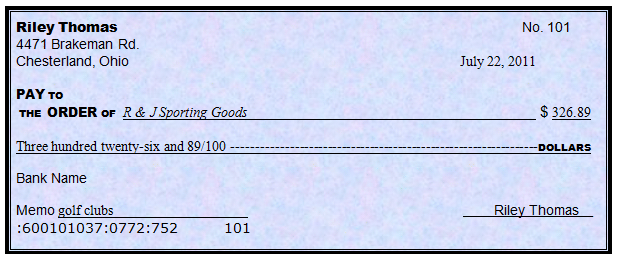
Checks are written instructions to the bank telling the bank who to pay and how much to pay them.
Directions for writing checks:
 |
- Always use ink – so your check can not be altered
- Always begin as far left as you can – to prevent someone from filling in a different amount
- The number printed in the top right corner is the check number. When you receive your checks, they will already be numbered in order.
The number on check above is 101.
- The top right line on the check is where you write the date you are writing the check. You should always use the actual date. Using a date in the future, called postdating is not legal.
July 22, 2011
- The line that reads “Pay to the Order of” is where you write the name of the person or company that is to receive the money. Make sure to spell the name correctly.
R & J Sporting Goods
- To the right of the dollar sign ($), write the amount of money you are writing the check for using numbers and a decimal between the dollars and cents. Start at the left end of the line so no one can write in additional numbers before what you have written.
326.89
- Write the dollar amount you are writing the check for in words followed by the cents over 100 on the line that ends with the word DOLLARS.
Three hundred twenty-six and 89/100
- After completing the check amount in words, fill in the remainder of the line with a wavy line. This again prohibits someone from changing information you have written.
- The dollar amount written in numbers and the amount written in words should always be the same. If they are not the same, the bank will pay the amount written in words.
- The bottom left line which may read “Memo” provides space for you to jot down what the check is being written for.
golf clubs
- The bottom right line is where you sign your name in cursive. This is the official proof that you are the one writing the check and, therefore, giving the bank instructions for paying this check out of your checking account.
Your Signature
- The bottom left of the check has a series of numbers already printed on it. This is called the routing number. It is used by the bank as part of its accounting system and includes your individual account number.
:600101037:0772:752
![]() Checks (03:25)
Checks (03:25)
Let’s Practice Check Writing
Riley needs some help with her check writing. Look at each of the following checks and identify her mistakes.
from writing in additional numbers i.e. 1,326.89. |
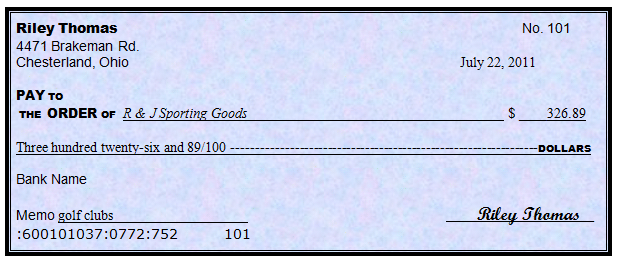 Riley did not place the number 326.89 close enough to the dollar sign to prevent someone
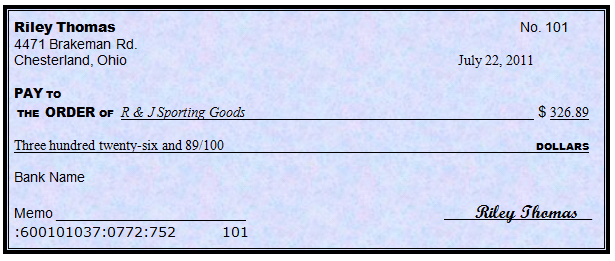 After completing the check amount in words, Riley did not fill in the remainder of the line with a wavy line. Riley did not fill out the memo line. After completing the check amount in words, Riley did not fill in the remainder of the line with a wavy line. Riley did not fill out the memo line. |
|
 Riley printed her name instead of signing in cursive.
For assessment question 5, open document Riley’s Check and follow the directions. The document is an Adobe Acrobat file. Click on the pencil icon to open the document. Save the document to a folder on the computer; then enter answers in the textboxes.
|
Riley’s Check Answer Key (Password Protected) |
Using a Checkbook Register
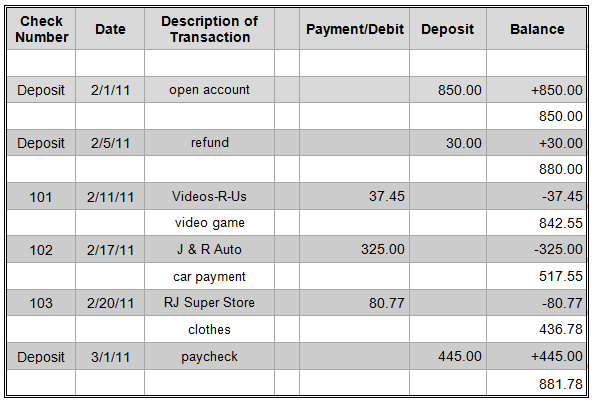
To keep track of the money in your checking account, you have to use a checkbook register. A checkbook register is a place to record all your deposits and checks.
Checkbook Register #1
In the left hand column, record the check number if you are writing a check or the word deposit if you are making a deposit.
Column #2 In the second column, write the date of the check or deposit.
Column #3 In the “Description of the Transaction” column, each time you write a check make note of who received it and what was purchased. If you are making a deposit, write the source of the deposit (i.e. paycheck, refund, etc.) in this column.
Column #4 Write the amount of the check in the “Payment/Debit” column. If it is a deposit, nothing goes in this column.
Column #5 In the Deposit column, record the amount of the deposit. If it is a check, nothing goes in this column.
Column #6 The “Balance” column has the amount of money in your account. To figure your balance, ADD deposits and SUBSTACT checks. Check registers have every other line white and every other line gray. Use the white line to record the balance and the gray line to make addition or subtraction calculations. |
Note: You can use a computer spreadsheet to keep your checkbook register. A spreadsheet can be set up so the math is done for you.
Let’s Practice Completing a Checkbook Register
Open document Riley’s Checkbook Register and follow the directions. The document is an Adobe Acrobat file. Click on the pencil icon to open the document. Save the document to a folder on the computer; then enter answers in the textboxes.
Riley’s Checkbook Register
Check your work by opening document Riley’s Checkbook Register – Check Sheet.
For assessment question 6, open document Riley’s Checkbook Register and follow the directions. The document is an Adobe Acrobat file. Click on the pencil icon to open the document. Save the document to a folder on the computer; then enter answers in the textboxes.
|
Riley’s Checkbook Register Answer Key (Password Protected) |
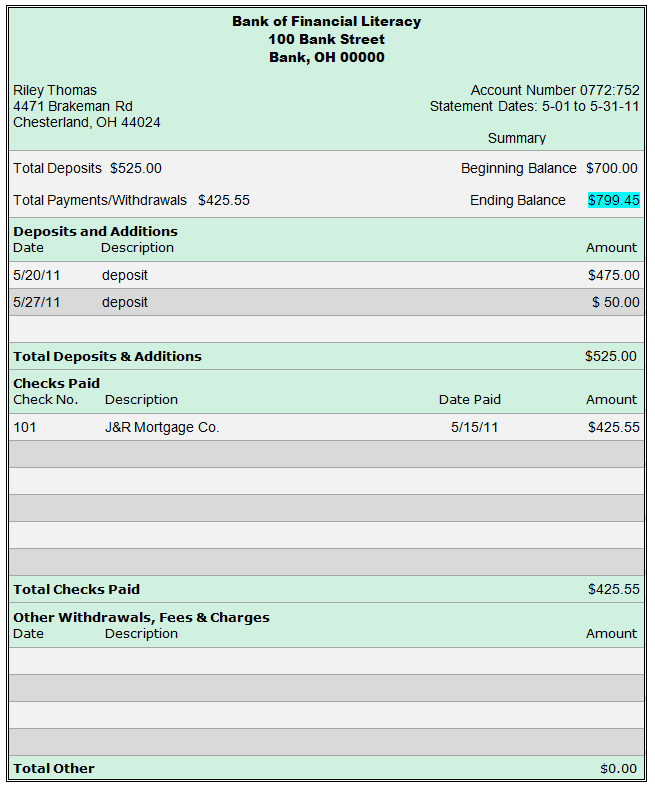
Bank Statements
 When you have a checking account the bank will send you a bank statement each month which lists all deposits, checks written and balances. It is important to balance or reconcile your checkbook by comparing the balance in your checkbook with the balance on the bank statement. This helps you to discover and correct any mistakes you may have made. It also ensures there have been no mistakes on the bank’s part.
The bank statement will list any deposits that have been made, ATM transactions completed, and all checks that have been paid out by the bank. Some checks you have written may not be listed on the statement because the person has not yet cashed them. These checks are called outstanding checks.
If you forget to record a check or make a math error, you might write a check for more money than you have in your account. This is what is meant by the term “bouncing a check”. Bouncing a check is against the law and will hurt your credit rating. Stores charge additional fees for bounced checks; your bank will also charge a fee, so it can become a very costly mistake. Let’s look at a sample bank statement and worksheet for balancing your checkbook.
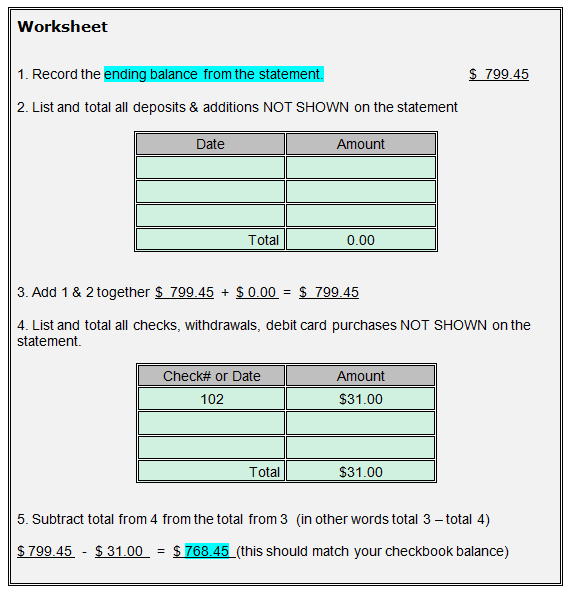
Balancing Your Checkbook
In order to balance your checkbook you need your checkbook register, bank statement, and checkbook balancing worksheet. Using the information provided in the register and on the statement, complete the worksheet.
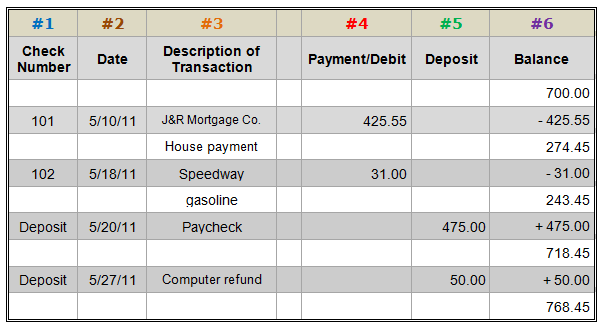
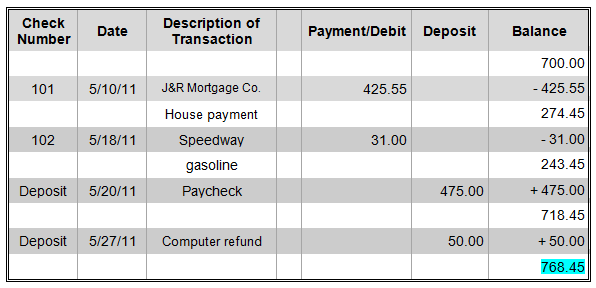
1. Record the ending balance from the bank statement in line one of the worksheet. $799.45
2. Look over the checkbook register and list and total all deposits and additions NOT SHOWN on the statement. In this case the answer is 0 because all deposits and additions are shown on the bank statement.
3. Add the ending balance and the total of the deposits and additions not shown on the statement. $799.45 + 0 = $799.45
4. Look over the checkbook register and list and total all checks, withdrawals, debit card purchases NOT SHOWN on the statement. Check number 102 written to Speedway for $31.00 is not shown on the bank statement.
5. Subtract the total you obtained in number 4 from the total you obtained in number 3. $799.45 – $31.00 = $768.45
The sum should match the balance in the checkbook register. If it doesn’t match, you have made a mistake either on the worksheet or in your register. You need to find and correct the mistake.
Checkbook Register
 |
Sample Bank Statement
 |
Checkbook Balancing Worksheet
 |
Let’s Practice Balancing a Checkbook
Open document Checkbook Balancing Worksheet and follow the directions. The document is an Adobe Acrobat file. Click on the pencil icon to open the document. Save the document to a folder on the computer; then enter answers in the textboxes.
Checkbook Balancing Worksheet
Using the information provided in the checkbook register and bank statement below, complete the check balancing worksheet.
Checkbook Register
 |
Bank Statement
 |
Check your work by opening document Balancing Checkbook – Check Sheet.
For assessment question 7, open document Riley’s Checkbook Balancing Worksheet and follow the directions. The document is an Adobe Acrobat file. Click on the pencil icon to open the document. Save the document to a folder on the computer; then enter answers in the textboxes.
|
Riley’s Checkbook Balancing Worksheet Answer Key (Password Protected) |
Endorsing Checks
When someone writes a check to you, you must sign your name on the back to cash the check. You sign on the same end as the “Pay to the Order of” is on the front. Writing your signature on the back is called endorsing the check.
There are three different types of endorsements. Each one has a different purpose. Blank endorsements are simply signing your name. As a result, you can cash the check to receive money or to make a deposit in your account.
If you lose checks after they have your signature on them and others find them, they might be able to cash the checks. It is always best to wait until you are at the bank before you use this type of endorsement.
(Back of the check)
|

Restrictive endorsements restrict or control what can happen to checks. A common restrictive endorsement is “For deposit only” and then your signature. This means the entire amount of the check is going to be deposited into an account. If lost after it is endorsed, this check would be harder for someone to cash.
(Back of the check)
|

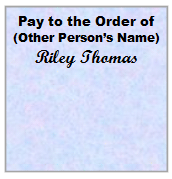
The third type of endorsement is special endorsement. You can give the check to someone else to cash by writing Pay to the Order of, the other person’s name, and your signature. This would be helpful if George made a check out to you for his soccer uniform and the check really should have been written to Coach Smith. You could use the same check by writing Pay to the Order of Coach Smith and signing your name. This would save you from having to cash the check to give the coach the money or writing a new check yourself.
(Back of the check)
|
Lets Practice – After reading though each of the following situations, determine what type of endorsement would be best.
1. Riley’s sister Hope wrote a check to Riley for their mother’s birthday present. Riley’s brother volunteered to buy the gift and told Riley to just sign Hope’s check over to him. What type of endorsement should Riley use?
2. Riley needs to deposit her paycheck into her bank account, but she does not have time in here schedule. Hope volunteered to do it for her. What type of endorsement should Riley use?
3. Riley is going to the bank to cash her paycheck. What type of endorsement should Riley use?
If you answered special endorsement for the first situation, you are right. There is no need for Riley to cash Hope’s check when all of the money is going to her brother.
Restrictive endorsement is the correct answer for #2. She wants to be sure the check can only be deposited and not cashed if Hope loses the check and someone else finds it.
The last situation requires a blank endorsement so Riley can receive the money in cash.
Answer Assessment questions 8-11.