IMPRESSIONS, MARKS,
AND BALLISTICS
UNIT OVERVIEW: Shoe print impressions, tool marks, and ballistics all yield trace evidence that the C.S.I. or other investigators use as part of solving crimes. This unit introduces each type of trace evidence, a description, and the methods for collection. Keep in mind that this course is just an “introduction” to forensics. The field of forensics is more technical than will be explored in a high school level course.
DIRECTIONS: Read the following text, look at the illustrations, complete the activities, and then answer the questions. Key terms will be highlighted in bold print.
|
Key Terms |
||
|
shoe prints |
shoe impressions |
finger print |
|
accidental characteristics |
visible prints |
plastic prints |
|
latent prints |
tool mark |
ballistics |
|
class characteristics |
trajectory |
GSR |
Shoe Print Impressions
According to Locard’s Theory, every contact leaves its trace. Since criminals enter and exit crime scenes, it is reasonable to assume that they may leave traces of their footwear. If a crime scene is not secured properly or is disorganized, footwear evidence is often overlooked or destroyed. If this evidence is collected properly and preserved by the C.S.I., and followed up with a detailed examination by a footwear expert, it can become an important part of proving or disproving that a suspect was at the crime scene.
Footwear impressions are often overlooked for two important reasons:
1. the lack of training and education in the proper searching, collection and
preservation of the evidence
2. the evidence is undervalued or not understood
The failure to collect footwear evidence revolves around the two reasons listed above.
The lack of success in finding footwear evidence is often due to these reasons:
|
1. Not believing that the impressions can be found at the scene after people have walked over the scene |
|
2. Incomplete searches of the scene |
|
3. Weather conditions |
|
4. The impression has been intentionally destroyed |
Shoeprints, sometimes inaccurately referred to as “footprints”, are found at crime scenes with great regularity. Because of this, shoe prints have long been studied by the police and crime laboratory personnel. Even though there has been no recognized “science” of footwear comparisons, it has been widely accepted by law enforcement as well as by the courts that this kind of identification can be made when there is adequate evidence available. The science of footwear investigation is evolving as new technology becomes available, and since more research groups are working on shoeprints, there is much more information out there.
Shoe prints may be found as either prints or impressions. Shoe prints are two-dimensional and are made by depositing or removing material from a hard surface. Shoe impressions are three-dimensional and are made in a pliable material. Both class and individual characteristics are present in each of the two types of trace evidence and are identifiable. A shoe print is unique due to its many variables: length of wear, random marks and scratches and the design on a particular sole.
Accidental, or identifying, characteristics can be defined as “characteristics that result when something is randomly added to or taken away from a shoe outsole that either causes or contributes to making that shoe outsole unique.” This definition was found on the Court TV web site. What this means is that contact with various walking surfaces or sharp objects will leave distinctive features on the surface of the outer sole. These might include cuts and scratches, patching materials, wedged rocks, etc. Photography and castings capture the characteristics of the shoe print. The accidental characteristics are revealed through image analysis and the comparison of the shoe print impression and the tread of the shoe. These characteristics serve as the “fingerprint” of the shoe, thus making it unique. The weight of the evidence is stronger if numerous identifying characteristics are present on the impression of a shoe outsole that can be matched to a suspect’s shoe.

Searching the Crime
Scene
When searching the crime scene, a first responding officer needs to be aggressive and alert. Footwear evidence should be one of the first considerations at the crime scene. The secured area should be marked off large enough to include entry and exit points. The first officer at the scene should also be aware of his/her own footwear impressions around the scene. If an officer must enter the crime scene, a military-type approach and exit should be used if at all possible. With this type of approach, the individual would step into his/her own footprints, leaving only one set of additional footprints that can later be eliminated. A restricted route should be thoroughly searched for evidence. The area should be carefully photographed and documented as to where each footwear impression is found. This procedure should be done first before any other search is performed. Once the impressions have been located and their location marked, the C.S.I. can come back later and complete photographing, casting and collecting, and processing. Always photograph footwear prints before doing any other retrieval techniques. It is vitally important to document each impression as to its position and surrounding area. Remember that position can tell you direction of travel.
To find footwear impressions during an interior search, entrance and exit points need to be inspected as most of the residue on shoes from outside surfaces may contain valuable impressions which are not easily seen under normal lighting conditions. When looking for prints indoors, the C.S.I. would attempt to darken the search area as much as possible. They would then use a strong white light with a directional beam that would cast the light over the surface at an oblique angle. Once the prints are located, the collection and recovery process begins. Excellent devices with strong white light are the forensic light sources. They contain a narrow beam of white light that provides an excellent source of illumination when it is held at a low angle. This type of light is much stronger and brighter than normal flashlights.

All footwear prints, whether indoors or out, should be photographed, documented, lifted and/or cast. Remember that a photograph or lift differs from a cast in that it is a two-dimensional reproduction of a print, just as a fingerprint lift. A three-dimensional cast is a structure which can provide a positive reproduction of the footwear. There are many products on the market for lifting footwear prints. Most of these products are adequate for the job, however, adhesive paper or contact paper can be placed over the print in dust or very light dirt.
The above mentioned technique works by placing the adhesive paper side down, over the impression and smoothing it over. This allows the impression to be transferred to the adhesive side of the paper. Once this is finished, the paper is then peeled off the impression and photographed. The paper can be treated with a mixture of 0.05 grams of crystal violet to 500 ml of distilled water. This stains the footwear impression, but produces a reversed image when collected. Once this step is completed, a sheet of clear acetate is placed over the print so it is preserved for impounding and later examination purposes.
When collecting latent impressions, fingerprint powders and lifting tapes can be used on various surfaces for contrast and recovery. Several of the chemicals used by latent fingerprint examiners can be used to enhance the footwear prints on a variety of items. Many of these latent prints can be located with oblique lighting. The same procedures are followed as if you were collecting latent fingerprints.
Since 1981 a new technology has been developed. This is called the electrostatic dust lifter. This is an outstanding recovery method for visible as well as for invisible footwear evidence. This method has been widely used around the world and has resulted in footwear identification. The system has a high voltage electrostatic charge that creates a charge on a piece of lifting film and causes some of the dust or residue particles to transfer to the underside of the lifting film. This method works quite well on a variety of surfaces such as floors, doors, countertops, chairs, fabric, metal, carpet, tile, newspapers, bodies, tar and many other surfaces. Again, the quality of the print is highly dependant upon the type of surface it is deposited on.
There are four standard methods of recording footwear impressions at a crime scene:
|
1. photography |
|
2. documentation/sketching |
|
3. casting |
|
4. lifting |
An experienced C.S.I. will know the most appropriate methods of developing the impressions to their fullest potential.
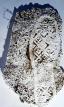
We already know that shoe impressions can be found in two forms: impressions and prints. Footwear evidence, just like latent fingerprint evidence, is classified into three categories: visible prints, plastic prints, and latent prints.
A visible print occurs when the footwear steps into a foreign substance and is contaminated, and then comes in contact with a clean surface and is pressed onto that surface. This can visibly be seen with the naked eye. An example of this might be dust prints tracked across a kitchen floor. Plastic prints are impressions that occur when the footwear steps into a soft surface such as deep mud, snow, wet sand, or dirt creating a three-dimensional impression. These impressions allow the examiner to see length, width, and depth. These types of impressions should be photographed first and then cast. Latent prints are usually the most overlooked print and are usually found on smooth surfaces. They are developed the same way as latent fingerprints. To collect these, a variety of powders, chemicals, and even forensic light sources make them visible so they can be collected properly.
Soil conditions can affect the appearance of an impression. A shoe print in mud may look like it was made by a smaller shoe than it was. Running creates an impression of a shoe that looks larger than it really is. A person’s weight and height may affect a shoe impression. There are relationships between shoe size, height, weight, and impression depth in various soils.
Patterns on the soles of shoes identify manufacturers, brands, and sizes. Since databases exist for shoe and boot soles, investigators can not only narrow down characteristics to specific brands, but they can also discover just how many items of a particular type were produced, where they were commonly available, and how long they were in production. For example, a composite of a shoe print from an athletic shoe will show individual intricacies of the pattern.
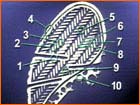
Sneaker print with 10 distinctive characteristics creates a fingerprint of the shoe.
For additional information on shoe print patterns click on
this link
http://www.forensicsciencesimplified.org/fwtt/FootwearTireTracks.pdf
Bicycle Print
Impression Activity:
With this activity, you will use
your analytical skills learned about shoe impressions to find out how the
weight of a rider affects a bicycle impression.
If you do not have a bicycle, borrow one from a friend, or better yet,
ask a friend to help you with this activity.
|
FORENSIC
SCIENCE KIT UNIT06 |
|
- bathroom
scale |
|
- bicycle |
|
- metric ruler |
|
- some friends
or family members |
|
- a sandy or muddy
area |
Make sure the bicycle
tires are inflated properly before beginning this activity. First, take an impression of a bicycle tire
without a rider. Measure the depth of the
impression and record the metric measurement in your science journal. Next, use riders of various weights. Make sure you have weighed each individual
before they sit on the bicycle. Record
their weight in your notes. Do not use the same impression over. You must start fresh each time! Make sure you analyze the amount of tire
sidewall that is making the impression.
There will probably not be much difference in depth unless the tires are
under inflated and/or your riders have great differences in weight. When you begin the question and answer
section, you will have the opportunity to share your activity results.
Printing the soles of
shoes:
Sometimes during an investigation
the C.S.I. will want a print of the sole of a shoe or boot. They will ink the bottom of the sole and
place a print of the sole on a sheet of white paper, being careful not to smear
the print. You can follow the same
procedure as a C.S.I. would do by completing this optional activity. If you do
not have ink available you can use some of the tempera paint found in your
forensics kit. The best way to apply
either ink or paint to the sole of a shoe or boot is with an old paint
roller. Use a pair of old shoes or boots
for this activity.
SHOE PRINT TRIVIA:
When investigators first began to collect shoe prints, there was no technology available to assist in this task. An officer would lay onion paper or tracing paper flat over the marks and would laboriously trace them with pen and ink or a charcoal pencil. At the time, this was state-of-the art-criminalistics.
For additional information on shoe print investigation click on this link
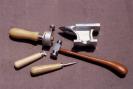
Tool Marks and Impressions
A tool mark is any impression, cut, scratch, gouge, or abrasion caused by a tool coming in contact with another object. Tool marks are most often found at burglary scenes where a forced entry was obtained, however, these are not the only times tools are used to commit a crime. Examination of tool markings can reveal important class characteristics such as the size and shape of the tool. Tools such as screwdrivers, knives, chisels, pry bars, and cutting tools, etc. will display a series of microscopic irregularities that have the appearance of ridges and valleys. Markings such as this are the result of the machining processes used to cut and finish tools. The shape and pattern of such minute imperfections are also the result of damage and wear and tear during the life of the tool. Because of this, it is highly unlikely that any two tools will be identical. It is the presence of these minute imperfections that imparts the individuality of each tool.
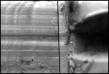
When the edge of a tool is scraped against a softer surface, it cuts a series of striated lines that show the pattern of the tool’s edge. Markings such as this are compared in the crime lab through a comparison microscope with test tool marks made from the suspect tool. In the lab it is difficult to duplicate a tool mark like the one left at the scene of a crime. In order for the examiner to complete a thorough comparison, they must prepare a series of test marks by applying the suspect tool at various angles and pressures to a soft metal surface (such as lead). This approach gives the examiner many opportunities to duplicate many of the details of the original too evidence marking.
When it is practical, the entire object or a part of the object bearing the tool mark is submitted to the lab for further examination. If it is not possible to transport the tool mark, a photograph is taken of the marked area to scale and a cast is made. A casting material called Mikrosil is used most often. This is a forensic casting putty that can develop marks in wood, metal, or glass. Mikrosil has a short setting time and good releasing ability, as well as preserving microscopic details. This cast is then compared to the recovered tool to provide identity of the tool to the crime scene.
A C.S.I. would never attempt to fit the suspect tool into the tool mark. Any type of contact between the tool and the marked surface may change the mark and will compromise the evidence. The suspect tool and mark must be packaged in separate containers so that there is no contact between the two. The C.S.I. must also keep in mind that the tool itself may contain important trace evidence.
Tool Mark Activity:
For this activity on tool marks, you
will need the clay and magnifying glass from your forensic kit. Collect a variety of tools from around your
household such as a screwdriver, hammer, pliers, etc. Roll out the clay and choose a tool and place
an impression of each side into the clay.
Use the magnifying glass to observe any detailed markings. What
did you observe? Roll the ball of clay
out again and repeat the steps using each tool.
You will have the opportunity to share your results when you answer the
unit questions.
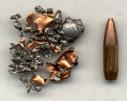
Broken Objects
 Often
during the commission of a crime, objects are broken at the crime scene. Pieces of metal or plastic left at the crime
scene can quite often be matched to objects possessed by the perpetrator. The shape of the break and its match to the
actual object are photographed in the crime laboratory. For the sake of identity, the broken object
must be recovered from the suspect, their vehicle, or residence in order to
provide a positive link between the suspect and the scene of the crime. Often
times buttons are broken during the act of a crime. Button pieces can then be matched to their
mates for a positive identification. Even
a piece of thread or fabric may be present with the recovered piece of button
which would help to provide an exact identification.
Often
during the commission of a crime, objects are broken at the crime scene. Pieces of metal or plastic left at the crime
scene can quite often be matched to objects possessed by the perpetrator. The shape of the break and its match to the
actual object are photographed in the crime laboratory. For the sake of identity, the broken object
must be recovered from the suspect, their vehicle, or residence in order to
provide a positive link between the suspect and the scene of the crime. Often
times buttons are broken during the act of a crime. Button pieces can then be matched to their
mates for a positive identification. Even
a piece of thread or fabric may be present with the recovered piece of button
which would help to provide an exact identification.
Weapon Impressions
Often during a crime, a knife or blunt instrument will be used during an attack. These types of instruments are considered weapons and often leave impressions or marks on an individual. When someone is battered to death with a blunt instrument, the blows are usually delivered to the head. A single blow is usually not enough to kill the victim, so multiple blows are made. The head may show depression fractures where the bones of the skull were driven into the brain tissue, causing death by compression of the brain. In cases such as this, the shape of the fractured area may provide clues about the shape of the weapon that the attacker used. The force of the blow, the angle of the blow, and the weapon used in the attack can all be determined from the damage to the bone. Forensic scientists can determine from the breaking patterns if the weapon was used on living or dead bone.
Knives are a tool frequently employed by criminals at close range and the stabs may be made by thrusting or cutting. From the angle, location, and number of stab wounds, it may be possible to make inferences about the height and strength of the attacker, and perhaps of his/her state of mind. The first responding officer may be able to offer clues by looking at the appearance of the stabbing and cutting wounds. They may even be able to offer some idea about the weapon of choice so the officers can be on the look-out for a similar weapon.
TOOL MARK TRIVIA:
Murders
with knives tend to be the most common type of killing in countries where
gun-control laws are strictly enforced.
Even in countries like the
Ballistics
It has been estimated that in the
The first conviction on this date, led to the modern science of ballistics. Ballistics can be described as the study of how bullets and other missiles fly, but loosely used to mean the study of firearms.
Types of Firearms
The name handgun suggests that this weapon is designed to be held in the hand. Handguns are sometimes referred to as sidearms. Shoulder weapons, called rifles, are designed to be held in two hands and fired from the shoulder. Some well-known types of firearms include: revolver, semiautomatic, submachine guns, hunting rifle, and shotgun. All firearms have something in common; that is that something is put in a tube, called a barrel, and then forcefully projected to hit a target. The something we are talking about is the ammunition, which falls into two types: a bunch of tiny objects, or one single, solid object.
All firearms work in a similar fashion. When the trigger is pulled, a firing pin strikes the back of the cartridge. This ignites a tiny pressure-sensitive charge called a primer. The primer then detonates the explosive powder in the cartridge. This forces the bullet (or shotgun pellets) down the barrel toward the target.
Most shootings are more hit-and-miss affairs, rather than a single bullet killing. In order for the C.S.I. to reconstruct the crime, it becomes necessary to determine where each bullet went and exactly how it got there. The first task at the scene is to figure out how many shots were fired. This can be determined by questioning witnesses or looking at the dropped weapon to see how many shot remain by counting the cartridges. Next, the C.S.I. looks for the bullets. A shooting victim is routinely X-rayed, and any lead lodged in their body shows up as a distinct shadow. The investigators search the scene until all of the bullets are located. Bullets that are found embedded in some sort of soft material is especially valuable as the markings found on it can help to identify at least what type of weapon fired it. If a weapon is recovered, the bullet markings may also prove without a doubt that the suspect weapon fired it. When bullets are squished against a hard surface beyond the possibility of analysis, it is important to find the point of impact. This allows the C.S.I. to trace the trajectory, or the path.
To trace the path, a C.S.I. would use lengths of rod and string, or by sighting through a succession of holes pierced by the bullet. Lasers are often used, but can only be seen and photographed in certain light conditions.
Cartridge cases may be found scattered around the scene of the crime. They help to identify the type of weapon used, but also where it was fired from.
Most types of weapons eject cartridges to the right; however, the posture and grip of the person firing the weapon can affect this. Markings found on cartridge cases provide valuable information by linking them to the weapon that fired them. The impact with the breech face (the rim that holds the cartridge in the chamber) stamps a unique pattern on the end. The ejector mechanism (the mechanism that discharges the spent casing from the chamber) scratches the metal in a characteristic way.

Gunshot Residue
Investigators look for primer gunshot residues on the victim, in a circle around the bullet wound, and on the suspect. The residue usually found on the suspect is found on the hands and clothes. When a victim is shot at close range, the entry wound is usually ringed with soot and “tattooing” marks where the partially burned propellant has been driven into the skin. By looking at the appearance of the ring, the C.S.I. or medical examiner can give some indication of range.
Residue found on the hands of a suspect indicates that they have recently fired a weapon. The absence of residue is not necessarily proof of innocence. Not all weapons have a weapon discharge. If a suspect washes their hands, the residue may be washed off. Because of this fact, investigators will sometimes test the clothes of a suspect and their face, as well as their hands. The suspect can also bear some traces of other materials that would suggest the use of a gun. Loading a magazine (part of the gun), for example, will transfer gun oil and metal onto the fingers.
At the scene, the C.S.I. will note the position of the hammer (if there is one present), and record the position of the hammer (down, half cocked, or cocked) before ever picking up a handgun. The safety and its position should also be noted. The weapon should never be disturbed until sketching, recording, and photographs are taken. These steps are rarely ever seen on crime-related television shows. The floor or surface of the area below the weapon also needs to be carefully studied for any type of mark or indentation which may indicate that the weapon was dropped from the hand of the shooter. Traces such as paint, wood, fiber, blood, hair, or other building materials should be protected until the weapon can be fully analyzed in the crime lab.
If a deceased victim is still holding a weapon, the C.S.I. will make careful notes as to the exact position of the arm and hand as well as how the weapon is gripped. If a suicide is suspected, the above mentioned positions can yield clues in the case. Another scenario is that the murderer could have placed the weapon in the victim’s hands after they were already dead.
The number and position of cartridge cases at the crime scene should be recorded. The sketch of the scene needs to include the location of the handgun, its make, model, serial number, caliber, and any other information that is descriptive. When the handgun is picked up, and the index finger and thumb on the checkered portion of the grip; these areas will not usually produce identifiable fingerprints. Handguns should never be picked up by inserting a pencil, pen, or stick in the muzzle end of the barrel as this might destroy clues. You will see this done on many crime-related shows; and this procedure is always incorrect. When weapons are fired at contact range (touching the victim) they will often collect hair, blood, and cloth fragments and fibers in the barrel. If a weapon has not been fired recently, dust, rust particles, and even spider webs may be present in the barrel.
Special care should be taken to not discharge the firearm while handling. The muzzle’s direction needs to be noted and all personnel cleared from the area in case the weapon would discharge accidentally. The firearm will be unloaded and all fired or nonfired ammunition will be noted. In the case of a revolver, the position of the cylinder and loaded and spent cartridges should be recorded. The same procedures hold true for a semiautomatic pistol. The type of information collected in the above procedures will help the investigator determine if the case should be ruled a suicide or a homicide.
Last but not least, any bullets and their position need to be recorded at the scene and photographed. The path a bullet takes is an important part when determining where the shooter was positioned. The locations of the spent cartridges also help to determine where the weapon was when it was fired. Bullets should not be removed from the objects they are imbedded in. This may destroy the very fine markings from the barrel rifling. If at all possible, the bullet and its object need to be collected in one piece and sent to the lab for analysis.
Gunshot Residue (GSR)
 Gases
are expelled from the muzzle of a weapon when it is discharged. These gases contain particles of the primer
and burning gunpowder. These particles
are known as gunshot residue, or GSR. When a weapon is discharged, the gases travel
in a rearward direction toward the hand of the shooter. GSR is usually deposited on the outside of
the hand as the palm area is protected from exposure to gunshot residue.
Gases
are expelled from the muzzle of a weapon when it is discharged. These gases contain particles of the primer
and burning gunpowder. These particles
are known as gunshot residue, or GSR. When a weapon is discharged, the gases travel
in a rearward direction toward the hand of the shooter. GSR is usually deposited on the outside of
the hand as the palm area is protected from exposure to gunshot residue.
Once the collected ballistic material arrives at the lab, it is first important to determine the distance the weapon was from its target when discharged. The examiner will use the same ammunition and the same gun involved in the crime and fire it at the measured distance. If the area struck by the original bullet has some partially burned powder, some unburnt powder traces, or smoke and burning, the analyst will be able to estimate the distance the gun was held from the bullet’s point of impact.
New technology methods have been developed that aid in determining gunshot residue, however, not all labs use the newer technologies. Some labs still test the “old fashioned” way and obtain reliable results for GSR. The chemical components that are found in the primer are the object of GSR testing. A suspect should have their hands protected with paper sacks to protect any trace evidence. Plastic sacks would cause perspiration to dilute the GSR. The technician wears latex gloves in order to prevent cross contamination of the surface. A cotton-tipped plastic applicator (looks like a long handled q-tip), is used in all techniques to collect samples from skin and clothing. A nitric acid solution is applied to the cotton swab and applied or sprayed first onto the skin or clothing and then collected with the cotton swab. The GSR is then tested with various applications.
If the suspect has a negative test result, that means that the suspect either took evasive action that removed GSR particles from the skin or else did not fire a weapon. A positive GSR test means that particles are present and the suspect has fired or handled a firearm during the past six hours. If the palms of a suspect contain GSR, but not the backs of the hands, there are two possibilities. The first is that the suspect held a recently fired weapon but did not fire it. The second possibility is that the suspect fired the weapon that was extremely “clean”, in that, very little GSR’s were released when it was fired. There is a six hour time frame in which to test for GSR on both the victim and the suspect.
Firearm Markings
 Firearms
and bullets need to be marked for identification purposes. Firearms are usually marked in inconspicuous
places, while bullets are marked on the nose or the base. After a bullet is marked, it is rolled in a
piece of paper and placed in an appropriate container. Firearms are stored in cardboard boxes. Any bullets recovered by the medical examiner
must be marked by the examiner as well as by the C.S.I. When a doctor is working on a live person, it
is important to try not to damage the bullet during removal, however, the
safety of the victim is more important.
Any bullets that are covered with body fluids or other moisture must be
allowed to air dry before they are marked and packaged. Cartridge cases need to be marked inside the
mouth of the cartridge.
Firearms
and bullets need to be marked for identification purposes. Firearms are usually marked in inconspicuous
places, while bullets are marked on the nose or the base. After a bullet is marked, it is rolled in a
piece of paper and placed in an appropriate container. Firearms are stored in cardboard boxes. Any bullets recovered by the medical examiner
must be marked by the examiner as well as by the C.S.I. When a doctor is working on a live person, it
is important to try not to damage the bullet during removal, however, the
safety of the victim is more important.
Any bullets that are covered with body fluids or other moisture must be
allowed to air dry before they are marked and packaged. Cartridge cases need to be marked inside the
mouth of the cartridge.
These are usually found at scenes where semi-automatic pistols are used. Often the ejection pattern of the casings can help establish the relationship of the position of the suspect to the victim.
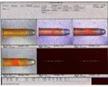
Ballistics
The ballistic lab analysis centers on the match between spent bullets and recovered firearms from the scene of the crime. Test-fires are conducted after all other forms of identification and lab testing have been completed. A test-fire process will be conducted in a chamber which will prevent any damage to the spent bullet. The new spent bullet is then examined under a microscope and matched to the original crime scene bullet. A fingerprint pattern (tiny rifling grooves and land markings) will be found in the barrels of handguns and rifles, but not in shotguns. It is these types of markings which are matched since a gun will always produce the same markings on every bullet fired.
Bullets
found at a crime scene can also be compared with similar evidence from previous
investigations. These hundreds of
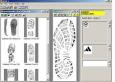
thousands of bullets can be compared using computer databases. Probably one of the most well known of these
is the
FBI’s Drugfire System. Firearm examiners
mount a recovered bullet or cartridge case on a microscopic stage, enter
initial data into a linked computer, and start a database search. A scanner automatically creates a digital
image of the evidence, and the system looks for similar records for visual
comparisons. This type of technology
saves examiners a lot of time as well as matching links between otherwise
unconnected crimes, and perhaps even solve the “cold” cases.
Related Forensic Career – Tool
Mark and Firearms Examiner
Careers in tool mark and firearms identification are usually combined as many of the same skills and qualifications are required for both. These examiners will use the skills of identification, comparison, and testing of: bullets, cartridges, gunshot residue, and the science of ballistics, serial number restoration, tool mark examination and other impressions, trace metal detection, as well as collection and preservation of firearm evidence. In the question and answer section of this unit, you will have the opportunity to seek more information about this career.
Careers in Forensics
If you are interested in becoming a forensic scientist or a crime laboratory analyst, you should ….
|
- love science |
|
- be determined |
|
- be good with details and like projects requiring a careful, step-by-step approach |
You should make high school count by ….
|
- making the most of your math and science courses |
|
- develop your public speaking skills (you’ll need this in the courtroom) |
|
- practice taking organized notes |
|
- scan newspapers to learn about legal cases requiring input from forensic Scientists |
|
- do your best on English papers and lab reports in Science (you will need strong writing skills to draft reports throughout your career) |
|
- read science magazines to stay on top of new discoveries |
According to
the American Society of Crime Laboratory Directors, crime lab analysts
typically start at yearly salaries of about $30,000. After many years of experience, they may make
between $60,000 and $70,000 yearly.
Conclusion
Forensics has improved the world of crime-solving through dedicated specialists and the use of state-of-the-art technology. Trace evidence such as shoe print impressions, tool marks, and ballistics have their important part in this process. New technology in recent years has added credibility to each of these sciences which allows the evidence to be accepted in courts of law.
The area of shoe print examination has become quite important as it can reveal many factors about the crime scene. Tool marks and impressions are as unique as fingerprints. Each tool has its own characteristics and may also provide trace evidence that will help solve a crime. Ballistics is a growing field. As more and more guns are purchased in this country and used in crimes, there becomes a need for better databases and methods of testing.