IMPRESSIONS
UNIT OVERVIEW: Impression prints such as those from
fingerprints, palms of the hands, ears, feet, etc. provide investigators with
evidence that can be used to help solve crimes.
Scanning technology itself has accelerated print identification
forward. This unit will examine the
types of prints that can be used in investigations as well as the techniques
used in obtaining print impressions. Students will build a “Forensics Science
Kit” from the list of common materials provided.
DIRECTIONS: Read the following unit, look at the
illustrations, and answer the questions.
Key terms will be highlighted in bold print.
|
FORENSIC SCIENCE KIT UNIT 05 |
|
~ Gallon zip lock plastic bag |
|
~ Tube of Super Glue (gel version works best) |
|
~ Can of soda or a drinking glass |
|
~ Magnifying glass |
|
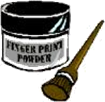
~ Fingerprint powder (see unit #14 for a list of companies that sell this product and the dusting brush). You might also call your local police department and they will give you a small sample; you could dust lightly with flour if the surface is dark in color, or use a soft lead pencil to make a mark and then press your finger into the lead mark and place on an index card and use the adhesive tape to lift the print). Another option is to purchase an inexpensive black ink pad. |
|
~ Fingerprint dusting brush or round makeup brush with a handle |
|
~ Optional activity on Super Glue fuming ( See Unit Extensions ) |
|
~ Baby wipes, packaged moist towelettes, or damp paper towels |
|
~ Wax paper |
|
~ Small bottle of tempera paint (washable) |
|
~ Large sheet of white paper |
|
~ Garbage bag |
|
~ Several small sheets of white folded paper |
|
~ Tube of red lipstick (inexpensive) |
|
~ Drinking glass or Styrofoam cup |
|
~ Clear adhesive tape or clear book binding tape (2-3 inches in width) |
|
Key Terms |
||
|
direct fingerprint |
latent fingerprint |
arch |
|
plastic fingerprint |
tented arch |
ulnar loop |
|
radial loop |
whorl |
cheiloscopy |
|
double-loop whorl |
central pocket loop whorl |
patent prints |
|
accidental whorl |
superglue fuming |
|
Introduction
to Fingerprinting
 Fingerprinting has been around for
hundreds of years so the idea is not new, however, the idea of using
fingerprints to help solve crimes has been in use since 1901. For many years it was difficult to convince
crime investigators that fingerprints are unique to an individual. The possibility of finding two individuals
with the exact same fingerprint is one out of ten to the sixtieth power. In 1900, Sir Edward Richard Henry created a
classification system that is still being used today in the United States. Another system of cataloging prints is in
widespread use today. It was developed
by Juan Vucetich. Fingerprints have
become the most common form of physical (trace) evidence where identity is
established between the perpetrator of a crime and the scene of the crime.
Fingerprinting has been around for
hundreds of years so the idea is not new, however, the idea of using
fingerprints to help solve crimes has been in use since 1901. For many years it was difficult to convince
crime investigators that fingerprints are unique to an individual. The possibility of finding two individuals
with the exact same fingerprint is one out of ten to the sixtieth power. In 1900, Sir Edward Richard Henry created a
classification system that is still being used today in the United States. Another system of cataloging prints is in
widespread use today. It was developed
by Juan Vucetich. Fingerprints have
become the most common form of physical (trace) evidence where identity is
established between the perpetrator of a crime and the scene of the crime.
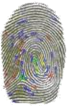
Fingerprints are impressions created by ridges on the skin. The tips of the fingers, palms of hands, toes and the soles of the feet have tiny ridges that provide traction to helps us grip things. Everyone has a unique pattern of skin ridges. The ridges form before a baby is born, and maintain their pattern throughout life. As you grow, the pattern becomes larger, but it never changes.
There are three criteria which make fingerprints a unique tool to the crime scene investigator. The first one is that fingerprints are an individual characteristic.
Secondly, it is impossible to change a person’s fingerprint. Even destruction to the fingers cannot change a person’s fingerprint ridge patterns. And third, fingerprints display characteristic ridge patterns, they can be organized into distinct groups or categories which help to streamline fingerprint identification.
There are three categories of fingerprints: direct, latent, and plastic. A direct or visible fingerprint (sometimes called an inked) is an impression of the ridge detail of the underside of the fingers (palms of hands, toes and soles of the feet are also included) on a receptive surface. These types of prints occur when a substance such as dust, ink, pigments, soot, oils, fine powders, flour, etc. adhere to the friction ridges. When these ridges come into contact with a clean surface, a fingerprint is left behind. A fingerprint made with blood and grease can sometimes be indistinct and can often be quite difficult to identify.
When a person touches an object, perspiration, grease, sweat, dirt, oils and amino acids on the skin are transferred to the object. Sometimes an impression of the ridge pattern is left. We know this impression as a fingerprint. Such prints are not visible to the unaided eye, so they are identified as latent fingerprints, or hidden prints. Just like prints on household appliances, many latent prints pop into view in the right light. Others need augmented by powders or a chemical treatment. Plastic fingerprints are formed when a finger presses against a soft, pliable material and leaves a negative friction ridge pattern impression. Some examples might include putty, chocolate, wax, soap, oil films, tar, clay, fresh paint, adhesive tapes, and resin.
There are certain facts which cannot be revealed by fingerprints such as the age or sex of a person, or either the race or occupation of the individual. Fingerprints do not reveal the age of the fingerprint itself. When the fingerprint is associated with a fact, such as the room was dusted four days ago, only then can a time factor be related to a fingerprint.
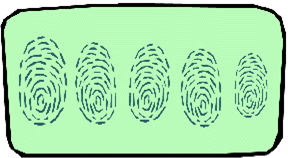
Is it a loop, whorl, or arch?
Fingerprints are based upon ridge structure and specific characteristics. The three basic patterns in fingerprinting are known as a loop, a whorl, and an arch. There are eight patterns in prints. An arch looks like a wave across the print. It is smooth-looking and is rounded at the top, without points. A tented arch is a somewhat exaggerated version of the plain arch. They push up sharply in the center of the wave and form distinct triangles at their centers. Arches are found in 5% of the population.
An ulnar loop in fingerprinting is like a loop anywhere else, the ridges appear to flow in from one side of the print, turn back on themselves, and leave on the same side from which they entered. Ulnar loops are loops that flow in the direction of the little fingers. Radial loops are loops that flow in the direction of the thumbs. Loops are found in 65% of the population.
The plain whorl looks much like an eddy in water, otherwise known as a “swirl.”
Technically, an examiner would say that at least one ridge
in the pattern makes a circle-like shape:
circle, oval, or spiral. Whorls
are found in 35% of the population. A double-
loop whorl is formed when two loops appear to run into one another and swirl around in a circle. A central-pocket loop whorl is a feature within a feature – the loop rests in the middle of a whorl, interrupting the outer edge of the whorl as a delta. The accidental whorl is defined by the parts of the whorl that are or are not inside lines drawn between deltas. Most accidental whorls often appear as small whorls inside what would otherwise be a tented arch-sort of a “pointy whorl.”
Even though there are eight patterns of fingerprints, you will only need to be familiar with the three large groups: loops, whorls, and arches. You will also need to know a general definition of each. To summarize the previous paragraphs we could say that …. A loop pattern has one or more ridges that enter from one side of the print, curve around, and exit from the same side. 65% of the population has loop patterns. Arch patterns begin on one side, rise to a peak or arch, and exit on the other side. Arches account for about 5% of fingerprints. Whorls are in a circular pattern with no entrance or exit, and with 30% of the population having whorls.
Fingerprint
Analysis
 The
analysis of a fingerprint begins by determining which patterns describe
it. Since all prints fall within one of
the three general patterns, each of the eight fingers and two thumbs generates
a description based on the individual characteristics of each pattern. As the print is examined, the examiner
answers yes/no questions about the print.
Each response generates a number in the examiner’s code and each
numerical response can be translated to a set of numerical descriptions. The complete code exactly describes the
print(s) in a way that machines – and people – can understand. As more and more prints are entered into the
database, the numbers grow into the millions.
Making a match without a machine that speaks the same language as the
examiner, becomes almost impossible. The
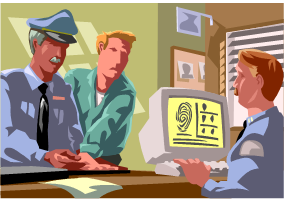
current FBI system, AFIS, can take those numbers and present examiners with a
manageable list of possibilities. The AFIS, or Automated Fingerprint
Identification System, is a computerized system that electronically scans
evidence prints and compares the scan to a digitized database of file prints. This comparison is an exercise in pattern
recognition. The system will output
potential matches for a human operator to examine and review. The computer’s “word” is not accepted as law;
a trained human expert will always examine the prints to verify the match. Television programs do not always portray
this part of the examination process.
Because of the AFIS technology, fingerprint identification has been
accelerated.
The
analysis of a fingerprint begins by determining which patterns describe
it. Since all prints fall within one of
the three general patterns, each of the eight fingers and two thumbs generates
a description based on the individual characteristics of each pattern. As the print is examined, the examiner
answers yes/no questions about the print.
Each response generates a number in the examiner’s code and each
numerical response can be translated to a set of numerical descriptions. The complete code exactly describes the
print(s) in a way that machines – and people – can understand. As more and more prints are entered into the
database, the numbers grow into the millions.
Making a match without a machine that speaks the same language as the
examiner, becomes almost impossible. The
current FBI system, AFIS, can take those numbers and present examiners with a
manageable list of possibilities. The AFIS, or Automated Fingerprint
Identification System, is a computerized system that electronically scans
evidence prints and compares the scan to a digitized database of file prints. This comparison is an exercise in pattern
recognition. The system will output
potential matches for a human operator to examine and review. The computer’s “word” is not accepted as law;
a trained human expert will always examine the prints to verify the match. Television programs do not always portray
this part of the examination process.
Because of the AFIS technology, fingerprint identification has been
accelerated.
Crime Scene Investigators should always search areas which are not normally thought about. These might include the underside of a counter, toilet seat covers, drawers, dishes, filing cabinets, back of chairs, rearview mirrors, and the hoods and trunk lids of vehicles. Objects that are handled on a daily basis often do not provide the best lifts for fingerprints.
Most criminals do not wear gloves at the scene of a crime as they are difficult to work in. C.S.I.’s attempt to consult with someone that is familiar with the scene of the crime to see if any objects appear to be out of place or anything new has been brought into the scene. These objects may provide the examiner with latent fingerprints which might have otherwise been overlooked.
When the fingerprints of a criminal touch blood, paint, grease, ink, dirt, etc., they generally do not need further developing. These prints are referred to as visible prints. They should be photographed and covered with tape. The entire surface will then be removed and sent to the crime lab for analysis. Other prints that are handled in a way similar to visible prints are plastic prints. Plastic prints are created by ridge impressions on a soft material such as putty, wax, soap, etc. Techniques may vary depending whether the latent print is on a nonabsorbent, hard surface or on an absorbent, porous material.
 As was stated previously, latent prints are
not always visible. The fingerprint
deposit expands upward from the surface and makes an ideal adhesive base for
fingerprint powder. A small amount of
fingerprint powder is applied with a brush (carefully rolled between the palms
of the hands to remove all existing dust and foreign particles) to the area to
be examined. The brush should just touch
the powder and the entire area should be covered using light, even strokes
until some ridge detail begins to show.
When the ridge patterns become visible, the brush strokes should be
directed to follow the contour lines of the print. Once all of the details of the print have
been developed, any excess powder should be removed by gently brushing or
blowing it away. The powder needs to be
allowed to adhere to the wet, tacky areas of the latent print, but not to the
surface where the print is deposited.
As was stated previously, latent prints are
not always visible. The fingerprint
deposit expands upward from the surface and makes an ideal adhesive base for
fingerprint powder. A small amount of
fingerprint powder is applied with a brush (carefully rolled between the palms
of the hands to remove all existing dust and foreign particles) to the area to
be examined. The brush should just touch
the powder and the entire area should be covered using light, even strokes
until some ridge detail begins to show.
When the ridge patterns become visible, the brush strokes should be
directed to follow the contour lines of the print. Once all of the details of the print have
been developed, any excess powder should be removed by gently brushing or
blowing it away. The powder needs to be
allowed to adhere to the wet, tacky areas of the latent print, but not to the
surface where the print is deposited.
To lift the print, the technician holds the folded or loose end of the lifting tape, while wearing latex or vinyl gloves. By wearing gloves, the technician does not get prints on the lift tape. With the thumb and the forefinger of one hand and the roll of tape in the other hand s/he pulls out enough tape to cover the area to be lifted. S/He then secures the loose end of the tape beside the print to be lifted, and holds it there with the forefinger. Then the thumb slides along the top of the tape forcing it gently down over the print. The roll of tape which is found in the other hand is not released during this operation. The print is now protected and the powder used for developing the print is now trapped between the tape and the surface of the object. The technician then smoothes down the tape with care over the print to force out any air bubbles.
Once the technician has secured the tape, one or two procedures may be followed. If the surface of the object would be destroyed when removing the tape, the tape may be left there and the entire object would be sent to the crime lab for examination. If this is not feasible, then the print may be removed by pulling up on the roll end. Once the tape is free of the surface, it is then placed on a latent fingerprint card. In the same way the tape was placed over the latent print. When the lift is secured to the card, the tape should be cut from the roll and the loose end folded up. If the developed latent print is larger than the width of the tape, it can be lifted by placing one strip beside another, allowing about ¼ inch overlap until the desired area is covered.
When wet items are selected for prints, they must be allowed to air dry first. Any prints without an identifiable ridge detail needs to be included with the ones that are identifiable as they may help the analyst to identify which finger the print came from. Sometimes, investigators use different colored powders to provide the sharpest contrast with the surface being dusted. On occasion, fluorescent powders are used so they will stand out against the most brightly colored or patterned surface.
One of the newest techniques is known as superglue fuming. This technique relies on cyanoacrylate ester, the active ingredient in this type of very strong, quick-acting adhesive. The fumes can be applied by heating the object in a closed cabinet, or by filling the whole of a closed space, such as the interior of an automobile, with fumes to reveal every latent print. Hand-held wands have also been developed that heat a small cartridge containing a mixture of the active ingredient and a fluorescent dye. These wands can be used to test a suspect area that includes both porous and non-porous surfaces.

Elimination prints of all persons who may have had access to the crime scene area need to be made before lifted prints recovered from the scene of the crime are submitted to the crime lab for analysis. This procedure makes it possible to eliminate everyone who had legal access to the crime scene. All personnel are fingerprinted at the scene, including the victim and any individuals who may live there. Again, this is a procedure usually not seen on television shows. These elimination prints are sent with any other collected evidence to the crime lab for comparison.
http://www.forensicsciencesimplified.org/prints/how.html
https://www.forensicscienceonline.org/fingerprint-identification/#context/api/listings/prefilter
https://www.nij.gov/topics/forensics/evidence/impression/pages/fingerprints.aspx
~ place the can of soda or drinking glass
in the zip lock baggie
~ place the baggie flat on a counter or
table
~ squeeze out a generous amount of
superglue into the baggie (don’t glue the glass or
soda can to the baggie)
~ seal up the baggie
~ blow some hot, moist air into the baggie
(like when you are trying to fog up a window
with your breath)
~ seal the baggie tight
~ the vapors from the superglue © will
build up in the tiny zip lock atmosphere and creep
up
into the prints on the glass or can
The vapors will
crystallize and, after a short period of time, you should see starchy white
fingerprints develop on the glass or soda can.
Do not, under any circumstances,
inhale the superglue © fumes. You should
ask an adult to supervise during this activity. In the questions and answer section of this unit,
you will answer questions about this activity.
Fingerprinting
the Dead
All autopsy procedures include fingerprinting the dead. This is a standard procedure after all other trace evidence has been removed from the fingertips and fingernails. If there is a lapse of time between the death of a victim and the autopsy, there may need to be some “reconstructive” procedures taken to ensure a clear set of prints.
Once rigor
mortis has passed and after the body has been kept in cold storage, the
fingerprinting is usually carried out.
If a body is badly decomposed, the hands of individual fingers need to
be removed to aid in the fingerprinting.
A mummified body would need to have the fingertips softened by soaking
them in a mixture of glycol, lactic acid and distilled water. It can take several weeks before any prints
can be obtained.
When the skin has been softened by damp or immersion in water, it can be difficult to obtain prints. Occasionally, glycerin or liquid wax will need to be injected into the fingertip from below the joint. If there is extensive tissue damage, the skin can be stripped away from the hand to be mounted on a surgical glove for prints to be taken.
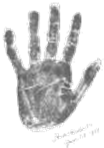
Palm Prints
Palm prints are as distinctive as fingerprints. Palm print evidence did not gain recognition until 1942 when evidence was used to convict a murderer. Records of palm prints are now being kept and classified and can reveal distinctive identification. To get a good palm print, the hand print is obtained by wrapping a print card around a can or other container and rolling the inked hand over it so the palm presses firmly.
Glove
Prints
More and more criminals have frequently resorted to wearing gloves as a way of not leaving fingerprints. This can be misleading as fingerprints can be obtained from the inside of surgical gloves or rubber gloves. From constant handling of objects, a glove will soon become impregnated with grease and dirt. In fact, the layer of dirt found on a glove can in some cases be as reliable as a fingerprint.
Ear
Prints

Yes, you read that correctly …. ear prints! Investigators have found ear prints on doors, windows, and even on walls. Apparently eavesdropping is popular with criminals, especially burglars who listen to confirm that a residence is empty. Since ears do not have ridges, it is quite impossible to apply the classifications used in ridgeology. On Occasion, it has been possible to use ear prints to exclude individuals from consideration of a crime. The inclusion of suspects, however, is much more difficult. The identification of a unique individual appears out of range at the present time.
Lip
Prints
Lip prints
often elicit curiosity about a possible means of identification. The study  of
lip prints is known as cheiloscopy. Lip prints are found on glasses, cigarettes,
and other surfaces. There are currently
no systems of lip print classifications, nor is there any one way of
individualizing lip prints from another.
However, because lip prints are numerous at crime scenes, they warrant
further investigation.
of
lip prints is known as cheiloscopy. Lip prints are found on glasses, cigarettes,
and other surfaces. There are currently
no systems of lip print classifications, nor is there any one way of
individualizing lip prints from another.
However, because lip prints are numerous at crime scenes, they warrant
further investigation.
Women wearing lipstick often leave lip prints on drinking glasses. The lips, like fingerprints, have distinctive markings. When collecting lip print evidence, the investigator sprinkles talcum powder near the print and spreads it both ways over the print with a soft brush. Once the print is photographed, a piece of clear plastic lift tape can be placed over the print and then lifted. This transfers the print to the lift tape and it can then be compared to suspects.
There are five common patterns found on the lips: short vertical lines, long vertical lines, rectangular lines that may crisscross, lines that form diamond patterns, and branching lines like those in a plant root. Examples of these five patterns can be found at the following web site:
For additional information on lip prints click on this link https://www.ncbi.nlm.nih.gov/pmc/articles/PMC4668728/


Footprints
There are methods to accomplish the difficult task of footprint classification. This is not a large or well-known field among forensic examiners. Footprints, like fingerprints and palm prints, can also be used for identification purposes. While fingerprints are generally accepted as the chief means of identification, the bulbs of the toes and the soles of the feet should not be disregarded. There will be times that it becomes necessary to use footprints for identification, especially where all fingers and hands are missing because of accidents or other reasons. Using palm and footprints does not replace fingerprint identification but is an aid to the latter. Using palm and footprints serves as an adjunct to fingerprints when fingerprints cannot be used in some specific instance or for some special reason.
Latent footprints, like fingerprints, contain organic substances; the amino and fatty acids, proteins, and oils that make up normal perspiration. Latent footprints show up in strange places. They have been found on walls, countertops, insides of car trunks, and even people can be the likely site. Latent footprints can quite often be lifted from the scene of a crime, even though first responders and medical personnel have walked through the site.
Forensic investigators need good light in which to identify and process footprints. The examiner must first conduct a visual inspection, and then using lighting techniques. Once a footprint is found, powders of various colors are used to lift the print.
Photography is a must as it documents orientation, and the distance between the prints and other objects. Photos that show scale need to be included in the series, so that one-to-one scale blowups are able to be produced.
A single footprint can be matched to a single piece of footwear. When a series of prints is used, it can provide many other kinds of information such as:
~ The distance between the prints indicates the height of
the person.
~ How an individual moved is indicated by the position of
the feet on the floor. If a
person is
standing, running, or creeping, various parts of the foot strike the surface in
different
ways. The examiner can determine where a
person paused or stopped flight,
or ran though
areas that are well-lit. This
information can reveal information about
the environment
of the crime.
~ A trail of prints can sometimes lead to secondary crime
scenes, to an exit that is
unknown, to
another set of prints, or to tire impressions that are connected to the
scene.
With a good print, it is necessary to decide what type of lifting material must be used. The type of tape used to lift fingerprints is one possibility, however, the overlapping of layers is time consuming as well as needing extra attention in order to do the job right. Another possibility is to use the wide tape used to lift palm prints and this means less overlaps. A disadvantage of wide tape is that it can be difficult to work with and may result in wrinkles and air pockets. On occasion rubber lifters may be used even though there will be a reversal of the image.
Prints that result from tracked mud, oil, or other substances also need to be photographed. These are called patent prints. There are two basic ways of placing the casting material in the impression or frame. First, mix dental stone in a plastic bowl and drizzle it into the impression using a spoon or stick. Begin at the outer edges and move towards the center. You could also mix the compound in a bag and snip the corners off. Next, pipe it in from the surface. By starting the lift several inches back from the edge of the form reduces the chances of cracking the cast.
Footprints: Adults and Infants
Human infants are born with indelible uniqueness of individuality imprinted as ridge formations on their fingers and palms. They also have individual ridge formations that appear on their toes and feet. Although infants change into adults and grow older, their individual fingerprint and footprint ridge formations remain unchangeable and fixed. The soles of the feet, like the fingers and palms of the hand, are covered with frictional ridges and pores. Sections of the feet are also divided and each section is given a specific name. the sole of the foot has five pattern zones: ball zone, plantar zone, calcar zone, fibular zone area, and the tribal zone area.

Mothers and newborn babies are printed in the delivery room. Newborns are footprinted and mothers are fingerprinted. However, numerous problems arise with footprinting newborns. The surface of the foot is wrinkled, the foot is very sensitive to touch and temperature, there are various secretions and body fluids on the foot, and only the most minuscule of ridge details are visible, and these are on a limited area of the foot surface. Experience shows that some sure, permanent means of identification of newborn babies, beyond such temporary hospital measures as neck bands, bracelets, markings, etc., is a valuable and worthwhile procedure.
The same equipment used in taking fingerprints is required in taking footprints. The complete sole is inked. The ball pattern area, immediately below the great toe, contains formations which are divided into three general pattern groups. These are similar to pattern groups in fingerprint classification: loops, whorls, and arches. In order to classify footprints, a person has to be necessarily familiar with the technical terminology used in fingerprint classification.
The amount of time and cost involved in the recording of inked prints of both adults and infants is negligible when the possibility of establishing the true identity of the person can be done by this means – its value cannot be measured in costs. Once properly taken and recorded, the foot impression is a definite means of providing a life-long identification for an individual. Where a child is involved, footprints can help to identify kidnapped, abandoned, and unexplained-death victims.
A word of caution: It is very possible that some partial latent palm and footprints may be unrecognizable as being a palm or foot impression. They can easily be mistaken for fingerprints. Keep in mind that when ridge impressions are found at a crime scene, they could have been made by a palm or foot, depending on the object and the location where the latent impression was found. When you are examining footprints …. you examine prints from the feet and not the feet themselves.
Footprint Trivia:
~ Footprint evidence is very rarely found at crime
scenes.
~The
in case of a
plane crash; in most instances it has been found that the shoes remain on
the feet and
thus the footprint is preserved. The
fingers are frequently too badly burned
to permit their
being used for identification purposes.
Foot to Height Activity:
The
bones of the feet can reveal an interesting fact about an individual. Let’s combine math with forensics to see
how. Access the following web site for
an activity where the feet can measure the height.
![]()
http://www.cyberbee.com/whodunnit/foot.html
and/or to view the Home Page click here PDF File
What
does the future hold?
The future of DNA profiling may have a great impact on fingerprints and lip prints. Because of major advances in DNA study, forensic experts have become aware of the possibilities and implementation that these techniques could contribute to investigation criminal cases. DNA is now able to be extracted from very small samples, even those that are latent or invisible. Although preferred samples from which to obtain DNA are those from biological fluids, it is possible to obtain DNA from fingerprints.
So what does this mean for lip prints? Since the possibility is there for studying DNA profiles obtained from fingerprints, this technology allows us to consider that latent or invisible lip prints (that is, lip prints from protective lipstick or long-lasting lipstick that does not leave any visible mark) may provide cell remains from which DNA can be extracted.
![]() Utilizing
Utilizing
Unit Extensions
Super Glue Fuming:
This activity is adapted from “Crime Scene Investigations.” (This is an optional activity and will require extensive time to prepare as well as obtaining additional materials). This lab will help you learn how to collect, preserve, analyze, and identify fingerprints.
Materials:
Glass slides with fingerprints from your friends and family
Rubber gloves
A large aquarium
One 12-oz. aluminum can with the top half removed
60-volt light bulb with a light socket and cord
Super Glue©
A piece of plywood large enough to cover the aquarium
Forceps (tweezers)
Paper towels
Clean white paper
Pencil and paper
Tape or labels
This lab
requires about 90 minutes. You
must ask an adult to supervise this activity because you will be using super
glue © fumes. Remember to wear latex or
vinyl gloves and goggles during the experiment and always work in a well-vented
area. Sometime before you begin
this lab, prepare the aquarium for the super glue © fuming. Using a large, clean aquarium, place a light
bulb or small lamp that will fit inside of one-half of an aluminum can. Cut a piece of the plywood or stiff cardboard
to cover the aquarium. Caution: Do not
breathe the fumes.
Wear rubber
gloves and distribute clean glass slides to all family members and
friends. Have each individual place a
fingerprint on the slide. Label the
slides with the letters A, B, C, etc.
Place the slides inside the aquarium for fuming during the lab
activity. To fume, drop a few drops of
Super Glue © on the can. Cover the
aquarium and turn on the light bulb. You
will start to see white prints form on the slides after about 15 minutes. Remember
not to breathe any fumes.
Turn a pencil sideways and rub a thick spot of graphite on paper with the pencil. Place the right finger of your family and friends in the graphite and roll their finger firmly from right to left. Use a strip of clear tape from your kit and place it against their index finger. Gently remove the tape and stick it to a sheet of white paper. Label each with the individual’s name. Make sure you have a print sample for each individual on the paper.
Turn off the light and remove one of the slides. Be careful not to smear or destroy the print. Compare the print on the slide to the set of prints taken from your family and friends. When you find a match, write the name of the individual on the sheet under their print. Identify each individual’s fingerprint as either a loop, whorl, or arch. Determine the percentage of loops, whorls, and arches. To find the percentage, divide the total number of individuals into the number of individuals with that type of print.
Fingerprinting:(Required)
Use the fingerprint set found in your forensics kit to lift fingerprints around your home. Apply the principles you have learned in this unit about fingerprinting and lifting fingerprints. Use the magnifying glass from your forensics kit to examine the prints. Try to match up the fingerprints with your family members. Use the wipes to clean up any powder residue.
Use the fingerprinting kit to fingerprint your family members and friends. Become familiar with the correct procedures. Can you identify any of the patterns? In the question and answer section of the unit, you will answer questions about your procedures and observations.
Footprints:(Required)
Use the bottle of tempera paint found in your forensics kit. Place the paint on a sheet of wax paper on the floor. (Suggestion: Place a garbage bag under the sheet of wax paper so there won’t be any spills).
Spread the paint out evenly on the wax paper so there is enough for your footprint. Place your foot in the paint and allow any drips to fall off. Place your foot on a sheet of white paper, being careful not to move your foot or smear the print. Remove your foot from the paper and wash well with warm, soapy water. Let the print dry thoroughly. Use your magnifying glass from the forensics kit and look at the print. Can you identify any of the ridge formations? You will answer questions about this activity later in the unit.
Lip Prints:(Required)
Lipstick makes it very easy to record lip prints. Using the lipstick found in your forensics kit, apply it evenly to both lips. Yes, boys …. you can do this too! Rub your lips together to spread the color evenly. Now fold a sheet of white paper, slip the folded paper between your lips, and press your lips firmly against the paper. Be careful not to slide your lips along the paper or you will smudge the print. Do your lip prints have any of the five patterns? Use the magnifying glass from your kit to look at the prints closely. Try taking lip prints from your family members. Can you identify any of their patterns or combinations of patterns? Did you notice any patterns that are the same or similar to yours?
Using family members or friends, leave lipstick prints on drinking glasses or Styrofoam cups. Use the roll of lift tape found in your kit and lift the lip prints. Use the magnifying glass in the kit to closely observe the prints. Follow the correct procedures for lifting prints. Can you identify any of the five patterns? You will have the opportunity to answer questions about lip prints later in this unit.
Related
Topics
Careers to explore:
Cheiloscopy
Print Examiner
Crime Scene Investigator
Topics to explore:
Juan
Vucetich
Sir Edwared Richard Henry
Conclusion
Fingerprinting, and print impressions of all kinds, has seen print identification move to the forefront of crime scene investigation. The technology involved in print impressions is “key” to solving crimes. However, one can not underestimate the importance of human observation and identification, as well as the painstaking techniques involved in obtaining useable print impressions.