BE SAFE!
Unit Overview
The role of a scientist often
involves doing experimentation in a laboratory or in the field (in the
world). Utmost care in designing
experiments and the use of proper technique is necessary, but so is observance
of proper laboratory behavior to ensure that no one suffers an injury. As a beginning scientific investigator, you
need to know what behavior is proper for the laboratory so that your experience
will be safe and rewarding. So much of
the fun of learning science is in the doing of science in the lab!
Attitude is Important!
Before your first lab
experience, your instructor should show you where all the safety equipment is
located, and its purpose should be discussed.
You should also have the opportunity to read over the procedures before
beginning so you have an opportunity to have confusing parts explained. When entering the laboratory setting, have a
serious attitude. Expect to enjoy the
experience and do not be afraid of getting hurt or doing something wrong, just
be cautious and calm. The following
expectations for behavior and dress are primarily just common sense:
1)
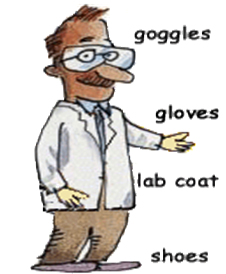
Wear sensible
clothing. Long and flowing sleeves
should not be worn. They can knock over
equipment or catch fire when draped over flames. Shoes should cover most of the foot to
provide more protection in case of glass breakage or the spilling of
chemicals. Do not wear sandals or
open-toed shoes.
2)
Long hair should
be tied back to keep it away from the work area. Never lean over open flames as hair can
easily catch fire. The flame of a
properly burning Bunsen burner is nearly invisible. For this reason, light the burner immediately
before you need it, and turn it off as soon as you finish using it.
3)
Rings, watches,
and other jewelry are dangerous in the lab.
Dangling jewelry can catch onto equipment and cause an accident. Chemicals can get under rings, bracelets, and
watches and cause irritation.
4)
Never wear contact lenses in the laboratory. It is nearly impossible to remove contacts
after chemicals have been splashed into the eyes. The chemicals trapped under the lenses will cause
greater damage to the eyes. The plastic
in some lenses allows vapors to penetrate them.
Excessive irritation to the eye can occur. Wear regular glasses along with safety
glasses or goggles if instructed to do so.
Regular glasses are not sufficient protection when goggles are required.
5)
Goggles are
required to protect the eyes if hazardous chemicals, glassware, or burners are
used. Proper goggles shield the eyes
from all directions. If available,
waterproof aprons and gloves should also be worn for additional protection of
clothing and hands.
6)
Never joke around, shove, push, or make any quick movements
while in the lab. Doing so can cause
accidents. Equipment can be broken, and
falling into equipment or flames can cause injury. If you must move about the room, do so slowly
and quietly so as not to disturb others.
When getting materials from the storage area, only one student should go
for the group to avoid excessive movement in the lab.
7)
 Do not touch equipment or chemicals unless it is part
of your procedure. They may be
there for other students.
Do not touch equipment or chemicals unless it is part
of your procedure. They may be
there for other students.
8)
Perform only
those experiments as you are instructed.
If you do not understand what you are to do, ask the teacher to explain
or demonstrate what to do.
9)
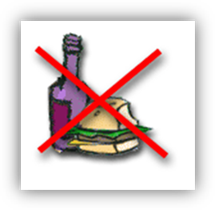
Do not eat,
drink, chew gum, or put on makeup in the laboratory. Contamination resulting in poisoning or skin
irritation may result.
10)
If you are aware
of damaged or broken equipment, tell the teacher immediately so a replacement
can be given to you.
11)
After setting up
equipment, have the teacher check it before starting the procedure. This can reduce the chance of accidents.
12)
Read labels
carefully to be sure you are using the proper substance. If you are not sure, ask the teacher. Never use more chemicals or ingredients than
you are instructed to use and never put unused chemicals back into the original
bottle. That can cause
contamination. The extra must be
disposed of as waste.
13)
Never leave an experiment unattended. If you must go for materials, be sure your
partner is watching the experiment.
14)
Should an
accident occur, inform the teacher immediately.
If a student is injured calmly but loudly call out the teacher’s
name. Do not panic! Do not come in contact with another person’s
blood.
15)
Never taste or smell any chemicals without prior permission
from the teacher.
16)
Never remove any chemicals or equipment from the laboratory.
17)
Never place hot glassware under cold water as it may
shatter. If glassware breaks, call the
teacher. Do not pick up broken glass with bare hands.
18)
If glassware is
hot and must be moved, use tongs (beaker tongs or crucible tongs) and place on
a protective pad until cool. Remember
that hot glassware looks no different than cool glassware. It can quickly burn the skin. Allow several minutes for the object to cool
before handling.
19)
Never look into a container that is being heated and never
point a test tube that is being heated in the direction of anyone. The quantity of material in a test tube is so
small that it can quickly boil out and shoot across the room if heated with a
burner. A much safer method of heating a
test tube is to use a water bath. A
water bath is a beaker of water in 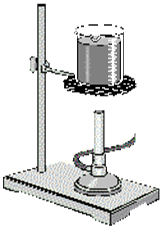 which the test tube is placed. The burner then heats the beaker. The warm water slowly transfers its heat to
the test tube. The temperature will
never become greater than that of boiling water (100oC).
which the test tube is placed. The burner then heats the beaker. The warm water slowly transfers its heat to
the test tube. The temperature will
never become greater than that of boiling water (100oC).
20)
If a chemical is
spilled, contact the teacher immediately to receive instructions. Most chemicals used in middle school and
high school labs can be washed off with running water. However, these methods should have been
discussed in the lab write-up. In a few
instances other methods may be needed. Be
sure you follow instructions.
21)
Keep work areas
clean and tidy. Be sure you know where
to dispose of all waste. Never put
solids down the sink. Some chemicals may
be hazardous and require special care.
In that case, your teacher will have you dispose of those in a special
waste container. Be sure to follow those
instructions carefully. If used matches
are to be thrown in the wastebasket, be sure they are thoroughly extinguished
before doing so.
22)
When you have
finished the lab procedure, return the lab station to the same condition in
which you found it.
Proper
Use of Lab Safety Equipment
Although the primary
responsibility of operating the safety equipment in the lab belongs to the
teacher, you should understand how each is to be used and where they are
located.
Eye
Wash Station: The eye wash is used to wash chemicals or particles
from the eyes.
u
Eyelids must be
held open forcibly and kept open to ensure effective washing.
u
A minimum of 15
minutes of flushing the eyes with water is needed.
u
A medical
professional, such as a school nurse, should then examine the eyes to see if
further attention is needed.
Safety
Shower: The safety shower is used to
wash off chemicals from large areas of the body or from areas that cannot be
safely rinsed at the sink. Also,
clothing fires can be extinguished with a safety shower.
u
A safety valve
may first have to be opened before the shower can be used.
u
The person should
remove all clothing, jewelry, and shoes before going under the shower.
u
Allow large
amounts of water to flood the body for several minutes.
Fire
Blanket: Fire blankets can be used to put out clothing
fires but certain precautions must be followed.
u
In using a fire
blanket be sure the individual is lying on the ground before wrapping them with
the blanket. Never wrap a student
who is standing because the blanket creates a “chimney” that can bring the fire
directly to the face.
u
If synthetic
fibers have melted, using the fire blanket could increase the severity of the
burns by pressing the melted fibers against the skin. In this case, it is better to use a safety
shower.
u
Shock victims can
be kept warm with a safety blanket.
Fire
Extinguisher: These are used to put out fires in the lab
but never to be used on a person.
u
Fire
extinguishers are classed according to the types of fires which they can
extinguish;
Type
A is for combustibles, such as wood, cloth, paper, rubber, and plastics.
Type
B is for flammable liquids, such as oil, grease, and paint thinners.
Type
C is for fires caused by electrical devices or equipment.
u
Some
extinguishers can be used for multiple purposes. Be sure you know what type is in the lab.
u
In most cases,
the teacher should be the one to use the extinguisher.
u
The average fire
extinguisher will only last about 10 seconds so do not waste it!
u
Remember proper
procedure with the acronym PASS.
P – pull the pin
A – aim the hose at the base of the fire
 S – squeeze
the handle
S – squeeze
the handle
S – sweep the hose back and forth
Fume
Hood:
The fume hood is designed to remove harmful vapors during an
experiment.
u
When performing
an experiment with a chemical known to have poisonous or carcinogenic
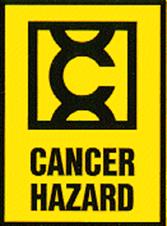
(cancer-causing) vapors, use the hood.
The fan provides ventilation to remove the vapors to the outside
atmosphere.
u
Whenever
possible, materials should be chosen that do not posses these characteristics,
especially for introductory students.
Automatic
Gas Shut-Off Valve: This valve can be turned off to stop the
supply of natural gas to all gas lines in the laboratory. This is a safety feature to cut down on
unnecessary exposure to gas fumes when no burners are being used. In addition, if a fire should break out when
burners are being used, shutting the valve removes fuel to feed the fire.
Proper
Use of Chemicals and Equipment
Acids
and Bases: Strong acids and bases are very corrosive. They should be stored in a special cabinet
under lock and key. This keeps them
isolated so they will not be accidentally used or spilled. Only the teacher should have access to this
cabinet.
u
When working with
acids or bases, use care not to spill them.
Keep bottles tightly capped when not in use. Goggles should always be worn.
u
Should you get
them on your skin, flood the areas with a lot of running water for several
minutes. Inform the teacher of the
accident immediately.
u
Should you get acids
or bases in your eyes, be sure that someone takes you to the eyewash station
immediately to begin flooding your eyes with water. Inform the teacher immediately of the
accident.
u
Spills on the lab
station or floor can be cleaned by using a weak acid, such as vinegar, to
neutralize a base and a weak base, such as baking soda, to neutralize an
acid. Then, an absorbent material, such
as kitty litter, can be used to absorb the liquid before disposing of it in a
waste container.
Flammable
Chemicals: Flammability is a measure of how easily a
gas, liquid, or solid will ignite and how quickly the flame, once started, will
spread. Special cabinets are designed
for these materials to contain the flame should the substances ignite. Only the teacher should have access to this
cabinet.
u
When working with
flammable materials, always keep them away from sources of heat.
u
Spills should be
quickly cleaned up. Inform the teacher
so he/she can supervise the cleanup.
u
Caps should be
kept on the containers to avoid spills and the release of flammable vapors.
Laboratory Burners: Lab
burners typically burn natural gas (methane) or alcohol. Proper precaution is essential for safe
operation.
 Alcohol Burner: The alcohol burner consists of a small vessel
that holds the alcohol, a wick, a screw-on top which supports the wick, and a
cap to prohibit evaporation of the alcohol when not in use.
Alcohol Burner: The alcohol burner consists of a small vessel
that holds the alcohol, a wick, a screw-on top which supports the wick, and a
cap to prohibit evaporation of the alcohol when not in use.
u
Before lighting
the burner, be sure that all flammables are away from the burner and all loose
clothing or hair has been properly confined.
u
Light with a
match or barbecue lighter. Do not
attempt to light the burner from another lit burner or carry a lit burner to
another location.
u
Avoid working
over the flame.
u
When finished,
extinguish the burner flame with the burner cup.
u
When not in use,
store the cupped and cooled burner in the flammable storage cabinet.
Alcohol burner
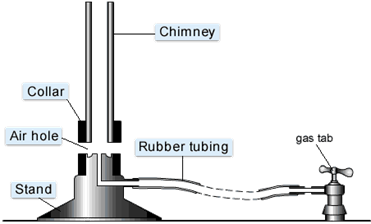
Bunsen
Burner: The Bunsen burner uses natural gas as its
fuel. It provides a very hot flame for
laboratory use. The parts of the burner
are listed on the diagram below. The
flame is produced at the top of the chimney and is nearly invisible if properly
adjusted. The collar is used to adjust
the amount of air entering the chimney.
u
Attach the rubber
hose to the gas outlet and to the burner.
u
Adjust the collar
so that at least part of the air holes are visible.
u
 Strike a
match and then turn on the gas outlet.
Strike a
match and then turn on the gas outlet.
u
Place the match
at the edge of the chimney to ignite the gas.
u
Once the flame is
burning adjust the collar so the flame is nearly invisible with a light blue
color. An orange flame is not very hot
and is an indication of insufficient oxygen. Open the air vents further until a
blue flame is achieved.
u
A roaring sound
indicates too much fuel. The gas inlet
valve should be turned back.
u
The chimney of
the burner should never be hot. If it
is, this indicates insufficient oxygen and the production of poisonous carbon
monoxide gas. Turn off the burner
immediately. Open the air vents and light again. If you cannot achieve a blue flame with the
chimney remaining cool, contact the instructor for assistance.
u
As with the
alcohol burner, all flammables should be away from the flame and all loose hair
and clothing properly confined.
u
Turn off the
burner immediately when it is not being used.
A properly burning flame is nearly invisible and a person can
accidentally reach over it or place objects over it.
u
Some burners have
a valve at the base to control the amount of gas entering the chimney. If the valve exists, be sure it is open
before attempting to light the burner.
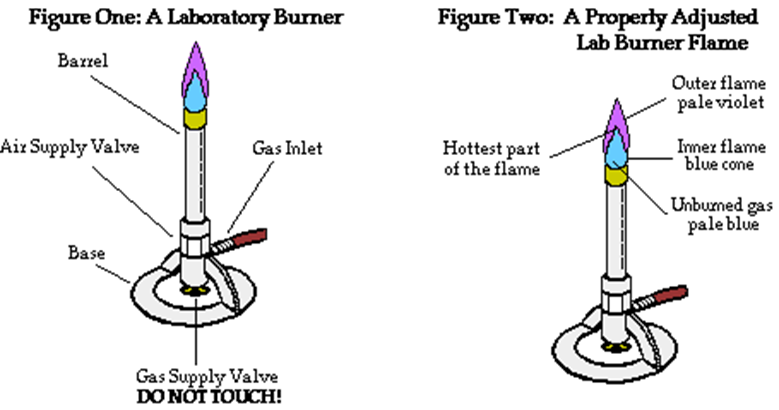
This allows for finer adjustment of the flame. See Figure One below.
u The hottest, cleanest flame is dark blue on the
outside with an inner cone of light blue.
The tip of the inner cone is the hottest part of the flame.
See
Figure Two below.
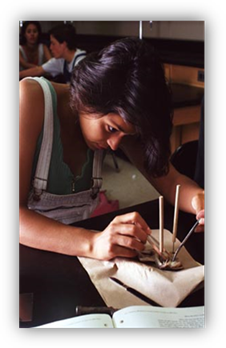
Dissection
Equipment and Procedures:
u Avoid contact with preservative chemicals. Wash the specimen thoroughly before
beginning.
u
Properly mount
dissection specimen to dissecting pan. Do
not dissect while holding specimen.
u
Hold scalpel or
the safety edge of a razor with extreme care.
u
Cut away from
your body and away from others.
u
Never ingest
specimen parts. Dispose of parts as
directed by your teacher.
u
Store dissections
as directed by the teacher and clean up the lab area.
u
Wash hands before
leaving laboratory.
Unit
Conclusion
Laboratory
safety is everyone’s responsibility. The
basic rules are mainly common sense and are designed to ensure that everyone
will have a safe and productive experience in the laboratory. Responsible, mature behavior is essential, as
well as knowledge of how to handle dangerous chemicals and how to operate
equipment. When these guidelines are
followed, the laboratory is a wonderful place to experience science at its most
interesting level.